
Wikipedia:Wikipedia Loves Art/US-UK/Museum Photography/Tips and Tricks
Equipment limitations[edit]
There are two basic rules that most museums follow regarding camera equipment:
- No flash or external lighting
- No tripods or monopods.
There are good reasons for these; camera flashes and even bright light such as from flashlights can cause harmful effects on old works and certain surfaces, and tripods/monopods can cause damage to displays and inconvenience other patrons.
The problems this presents is that lighting in museums is notoriously bad for taking decent, hand-held, flash-free photographs. With low lighting most cameras will take noisy, blurred images that are useless; for these reasons, if you don’t already know how to manually set your camera’s settings, you should dig out that manual (or find it online) and figure it out before you get to the museum. Take some test shots at home in a dimly-lit room as practice, and to test your camera’s performance.
Note that flashes are allowed at the V&A, and possibly other locations; some museums will also allow tripods. Double-check your museum's individual rules to be sure!
Technical aspects[edit]
Camera settings[edit]
The first thing to do is turn off your flash, if your museum doesn't allow flash photography. If you don't know how, get out the manual or look online; if you don't know how to turn it off you're stuck!
There are two main settings you'll use: the first is a shooting mode, called "Program". This option lets you choose one setting and will automatically adjust the others to the best choice for you. Less expensive compact digital cameras will only have one Program mode, which will allow you to turn the flash off and set exposure compensation; for more advanced cameras and DSLRs, choose Aperture Priority and set it to the lowest aperture possible.
The other important setting is EV, or "Exposure Value". This is normally at 0. Raising EV to +1 will result in a brighter photograph; lowering it to -1 will result in a darker photograph (See exposure compensation). EV is extremely handy for when the camera is in Program mode and is taking pictures darker or brighter than you want. If you notice that there are blown highlights on an object, you can lower the EV to correct this problem (be sure not to lower it too far and end up with an overly-dark image). If the subject is turning out too dark at 0 EV, you can raise it slightly until the subject is correctly exposed.
If your camera doesn't have a Program mode, you can either take your chances on Auto (provided your camera allows you to turn off your flash in Auto mode), choose a setting such as "Portrait", or set everything manually. Manual mode means you have to set the aperture, shutter speed, and ISO manually for each photograph, as lighting changes subtly depending on where you are in relation to the object, lighting in the room, reflections, and other factors. It takes much longer, but may be worth it if your camera doesn't allow you to set EV and pictures are over- or under-exposed.
Exposure[edit]
There are three aspects to setting the proper exposure: aperture, shutter speed, and ISO speed.
Aperture, also referred to as an f-number or f-stop, affects how much light is let into the camera. This will also affect how much of the image is in focus, and how much is blurry (depth of field). Some compact digital cameras go down to f/2.8, while others only go as low as f/8; you should choose the lowest aperture you can.
Shutter speed determines how fast the shutter moves; a shutter speed lower than 20 will usually result in blurry photos, though this can go as low as 10 or even 8 for some cameras; fast shutter speeds above 50 should turn out clear and sharp, as the shutter is closing much more quickly. Test a few shots until you find the lowest shutter speed you can shoot clear pictures at, and then use the speed that’s slightly faster just to be sure (if 20 is the lowest, use 25 or 30). See “Makeshift Tripods” and "Holding the Camera" below for tricks to allow you to use a lower shutter speed.
ISO speed determines how sensitive the camera’s sensor is to the light that hits it. An ISO speed of 100 is only useful in bright daylight, while a speed of 800 to 1600 will capture images in low light; however, the higher the ISO the more noise and grain you get. You generally need to shoot at between 400 and 800 ISO in a museum - take a few test shots to determine whether 400 is fast enough, or if you need to go up to 800. In some brighter exhibits you may be able to shoot at ISO 200, which is ideal.
Practical Cases & Helpful Hints[edit]
- Display glass: Many works are behind glass, which can cause reflections. For smaller objects, pressing your camera right up against the glass will both eliminate reflections and help steady the camera. For larger objects that require you to stand further back to fit them in the frame (and for paintings behind glass), walk back and forth until you find an angle at which reflections are eliminated or significantly less before shooting. A bad reflection can ruin a picture, so always check before snapping the shot.
- Makeshift tripods: Many objects can be used as a makeshift surface to rest your camera on. A flat description tablet; a post holding ropes in front of a piece; a short display case; even holding the side edge of your camera against a doorframe, wall, or the side of a display case will significantly reduce camera shake and the possibility of blurring. When using one of these tricks you can often lower the shutter speed (and consequently lower the ISO speed in some cases) as the natural shaking of your hands is reduced or eliminated.
- Holding the camera: To steady your hands and reduce shaking, hold the camera with both hands and tightly press your upper arms against your body. Most people tend to hold the camera at eye level with their elbows up in the air, which makes for a good deal of shake; if you have a digital display on your camera, use it so you don’t have to look through the eyepiece. If you only have an eyepiece, tilt your head and lower your neck forward if necessary so you can see through while your arms are still pressed against your body. It’s awkward, but allows you to use lower shutter speeds and reduces blur.
- White balance: If your camera has an option to manually set white balance, you should find out how and bring along a piece of white card or plastic to meter off of. This will help ensure that the colour of the object photographed is correct, and is useful when lighting changes from exhibit to exhibit. Not all cameras will accurately determine white balance on “auto”.
What Pictures to Take[edit]
One common mistake people make in museum photography is getting too close. While for artistic photography and casual shots this is fine, museum photography is more about documenting a piece; the photograph should clearly show the entire work.
You aren't limited to taking just one shot of each piece. Try taking a few from different angles, and then getting close to take pictures of important details.
Don't forget that those participating in Wikipedia Loves Art must also shoot the object with an index card in the frame that displays the object's accession number, your team name, and the category name so points can be awarded.
-
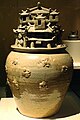 Full view of the piece
 -
 Closer shot of a detail
 -
 Closer shot of a detail
 -
 Closer shot of a detail


Pay Attention to Copyright[edit]
If you’re shooting an exhibit with pieces from Ancient Egypt, you obviously don’t have to worry about whether or not the items are protected by copyrights. However, exhibits featuring work from the 1800s and onwards may also have some pieces from 1923 and later; anything created after 1923 is protected and you cannot photograph them. Always check the dates on pieces if dealing with more modern exhibits, or if there is no exact date for the piece itself check the date of the creator’s death. If they died before 1923 you can be pretty certain the work wasn’t created after that!
For DSLR Cameras[edit]

If you have a DSLR and a selection of lenses to choose from, the best choices are:
- A macro lens for smaller objects
- A wide-angle lens for larger objects
- The lowest-aperture lens you have (non-macro) under 100mm
- Movement reduction (VR for Nikon, IS for Canon) in any of the above
When shooting 3D objects with macro lenses, be careful regarding depth of field. If you’re shooting a statue and the nose is in focus but the rest is blurred, the photo is useless; make sure you’re using appropriate apertures to keep the entire subject in focus. This is less important for 2D works such as paintings and prints.
You should also consider exposure bracketing, particularly for trickier works or more difficult lighting situations. It's often very useful to have a choice of exposures from which to pick the best.